

How to Change a Xerox Phaser 7800 Roller Feed Kit
Are you looking to change a Xerox Phaser 7800 roller feed kit? If so, you’ve come to the right place. This helpful article will guide you through step-by-step instructions on replacing the roller tray 2, 3, 4, or 5 feed kit on a Xerox Phaser 7800 color printer or Xerox Phaser 7800dn, Xerox Phaser 7800gx.
The following tutorial is for these models:
- Xerox AltaLink B8145, B8155, B8170, C8030, C8035, C8045, C8055, C8070
- Xerox Color 550, 560, 570
- Xerox Phaser 6510DN, 6510DNI, 6510N, 7500DN, 7500DT, 7500DX, 7500N, 7800DN, 7800DX, 7800GX
- Xerox VersaLink B600DN, B610DN, B7025, B7030, B7035, B7135, C500DN, C605X, C7000DN, C7000N, C7020, C7025, C7030, C7120, C7130, C8000DT, C8000W, C9000DT
- Xerox WorkCentre 6515DN, 6515DNI, 6515N, 7125, 7220, 7220i, 7220iT, 7220T, 7225, 7225i, 7225iT, 7225T, 7425, 7428, 7435, 7525, 7530, 7535, 7545, 7556, 7830, 7835, 7845, 7855, 7970
When Do You Need to Replace the Roller Feed Kit?
Understanding when to replace the roller feed kit in your Phaser 7800 is essential if you experience errors like:
- Error 309.609 - Roller can no longer be used and must be replaced
- Error 372.105 - Indicates there is a rate sensor jam.
- Paper fails to be picked up from the tray and leaves a black mark where the roller was spinning
Changing the Paper Roller step-by-step
Prior to starting, it is imperative to remember power off the device and disconnect from its power source at the back.
Once you’ve confirmed it is time to change and replace the paper roller found in the Xerox Phaser 7800 color, follow these simple, quick, and easy steps. In the example below, we'll focus on tray 2, but the same process applies to trays 3, 4, and 5. Let's get started.
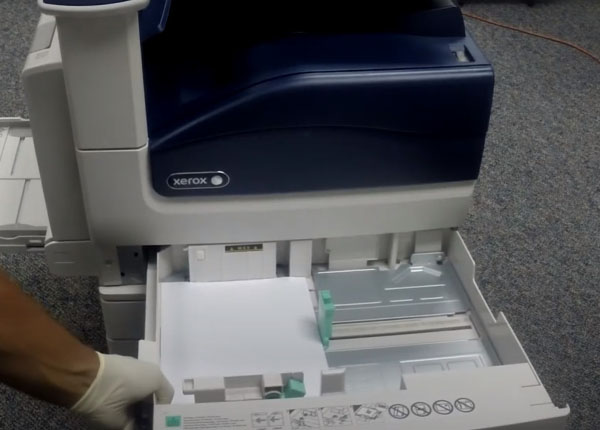
Step One: Removing the Tray
Take off the rollers by gently pulling the white shoe towards you for about an inch. Then you can remove the tray from the Xerox Phaser 7800.

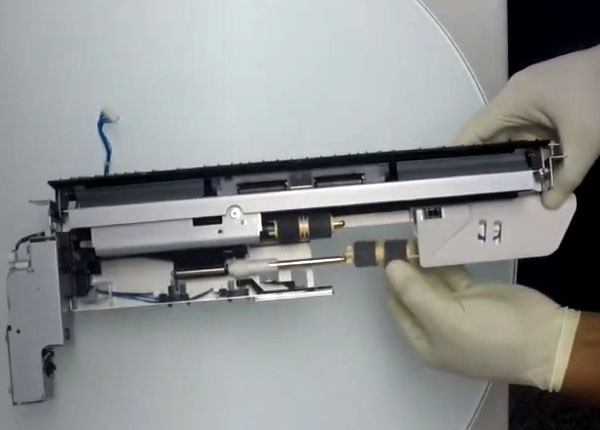
Step Two: Replacing the Roller
To replace the roller, first, pull down the security clip and slide the roller off. You might need to adjust the security clip by rotating the roller. To install the new roller, slide it into the shaft, ensuring the four connectors fit into the spacer. If needed, rotate the roller until it aligns correctly with the spacer. Repeat these steps for the remaining rollers.
Step Three: Replacing the Tray
Finally, complete the process by inserting paper tray.
Review Feeder Assembly Replacement, If Needed!
If you require more assistance, refer to the supplementary tutorials on the feeder assembly. For a more thorough understanding, an additional tutorial showcases the feeder assembly steps. Remember that the procedure is identical for trays 2, 3, 4, and 5.
Order Your Replacement Parts Today!
Congratulations on successfully replacing the 7800 roller feed kit for your Xerox Phaser 7800 printer. Make sure to reattach the tray after replacing all the rollers to ensure your printer is fully operational. Great job!
- 109R00790, 604K56080, 604K66430, 607K12020, 675K82240, 675K82242, 676K12691, 676K65020, 859K00100, 675K82243 - Xerox Roller Kit, 3 Rollers
Follow Us on YouTube for More Tutorials
Thank you for completing this step-by-step tutorial! We hope you found it useful. Remember to stay connected with us by following our YouTube channel and subscribing for more important content. We would love to hear from you, so please leave a comment.
Click here to view Item, Inc. YouTube channel.
Need More Help?
If you need more assistance, contact us. For sales, repair, or unsure about a part, call us, use our chat feature, or email us. We're here to help in any way!